Wednesday, July 10, 2013

Mini Chocolate Eclairs

Yummy cream filled Chocolate Eclairs....super yummy for a summer BBQ....
My French born sister-in-law Danielle makes these TO DIE FOR ECLAIRS every year at 4th of July. Everyone has come to expect and love her chocolate eclairs. She actually can't make a different dessert because everybody looks forward to these 4th of July Eclairs so much! Or they'd be great for a Summer BBQ too! These little cream puffs are so yummy I want one NOW!

My sis-in-law made the easy chocolate eclairs/cream puffs.....I made the fruity, chocolate cupcakes....both look great on our 4th of July table don't they? They are great for any summer BBQ too. 
Easy Eclairs or Cream Puffs Recipe:  
1 cup water
1/2  cube butter
1 cup flour
4 eggs
Heat oven to 400. Heat water and butter to a rolling boil. Stir in flour untilmixture forms a ball. Remove from heat. Let cool a bit till batter is not hot. Beat in eggs one at a time. Drop dough 1 Tbsp size onto baking sheet using a pastry bag. Mine were about 1 3/4 inches oval x 1 1/2 and I got about 30 little eclairs.

Cook until puffy and golden. I did 14 minutes at 400 and then turned oven down to 350 for 5 minutes. I think from posts I read on other blogs 20 minutes is perfect for smaller eclairs. Larger ones about 20 minutes at 400 and 4 minutes at 350 but watch them the last 3 minutes. Your oven might be different as I am at high altitude.

    Directions

    Heat water and butter till boiling. Add flour and stir constantly until mixture is smooth.
    The ingredients for cream eclairs are only 4....so easy! 
    Water, butter, flour and eggs....
    Batter before adding the eggs.....I let it beat a little to let off some of the steam....
    Then I added 1 egg at a time and beat for a minute in between eggs.....
    The eclair batter is  like pudding...
    I piped the batter onto a cookie sheet covered with parchment paper....
    I added a blob of eclair batter to each of the 4 corners...then pressed the parchment paper on top. It helps
    "glue" the paper down to the cookie sheets. 
    Here are my finished Eclairs....just out of the oven! 
    Now they are ready to fill with the creamy, rich pudding filling....each one was a half a handful ! 
    Cool. Cut a slit in the side of puff with a knife. Fill eclairs with a pastry bag filled with the french vanilla pudding mixture.  Make chocolate icing and spread over top.  Keep refrigerated. Makes 12 large or 24 eclairs (mine made 30 little round ones- bigger than the Costco size) I think this is a perfect dessert to bring to a party because if you have other desserts, this can be a side garnish and they are so cute and yummy too.

    French Vanilla Cream Filling
    1/2 pint whipping cream (smallest carton)
    1 small box instant French vanilla instant pudding
    1/2 cup milk
    Whip until thick.
    HERE is a link to a yummy eclair recipe from Annie's Eats if you like mocha flavor.
    1/2 cup milk, pint of cream and small box of french vanilla instant pudding....

    The filling is really rich and creamy too...I had to pop an eclair in my mouth to taste test it! 
    Squeeze inside of your little puffs....so easy! 
     Chocolate Fudgy Glaze
    1/2 slick butter
    2 Tbsp. cocoa
    2 Tbsp. milk
    2 cups powdered sugar ( I used a little less, just add it till desired consistency)

    Heat until melted, stirring constantly-add 2 cups powdered sugar until melted. Shake a fork
    back & forth and then the other way to ice tops of eclairs if you want a cool design. Or just frost with a knife.
    This was the most delicious chocolate glaze!  

    It was easy and quick....
    And it tastes like the most divine fudge!  Really!
    Chocolate Eclairs....oh my yum! Wouldn't these eclairs be cute with at little flag sticking out on a toothpick? I saw some at Hobby Lobby the other day....shoulda bought them now that I think about it.....
    Wouldn't you love a creamy, chocolaty, eclair bite?  That's what I'm talkin' about!  


    Tuesday, July 9, 2013

    French Bread Baguettes


    And here they are, hot out of the oven! French Baguettes are light and crispy! 
    Awhile back I went to a great cooking class and listened to a master cook and teacher named
    "The Food Nanny". She was just delightful and fun to listen to. She had so many food stories I could have listened to for hours.   Here is her book. It is less than $20.00 on Amazon.
    ck out her book, she has such a great meal plan to help families eat dinner together and stay close!

      I didn't have my purse with me so I didn't get an autographed copy of it! DARN! But I DID get her to take a picture with me, when I told her I had a food blog. Isn't she cute?

    She's a mom and a grandma too! (and she loves being a grandma best!)
    She made pizza dough and french baguettes both in under an hour....
    Anyway, she gave us all this fantastic recipe for French Baguettes!  It takes literally 5 minutes to make. She showed us this cool baguette pan too. I ran right over after the lunch class and bought one at Spoons and Spice..... my fav cooking gadget store. They are having a huge moving sale, so if you are in the Salt Lake City area check it out at Spoons and Spice.

    They had so many french bread pans to choose from and they were surprisingly CHEAP!
    My finished french breads.....Don't they look great?  They are crunch on the
    outside and soft in the inside...perfect to my taste.....
    French Baguette recipe....totally easy and seriously yummy! 
    Then I went to work. A half hour later here were my baguettes.  They taste just like a crusty french bread should. And no fat!  She gave us all kinds of tips about meal planning that I thought were fabulous! In a nutshell here is her plan....

    Sunday is traditional day...roast beef, chicken, those kinds of things.
    Monday is Comfort food...chili, mac and cheese, easy stuff like casseroles....
    Tuesday is Italian night....she does all her pastas here...she has tons of varieties....
    Wednesday is Meatless night....soups, salads, fish, or breakfast for dinner, waffles, french toast, pancakes, bacon, etc.
    Thursday is Mexican Night. Tacos, Enchiladas, mexican casseroles, burritos etc.
    Friday is Pizza night and all the kids invite their friends over for her out of this world pizza varieties.
    Saturday is Grill night. They do a lot of hamburgers or chicken on the grill.

    Doesn't that sound fabulous and fun?  I thought so too.   Gotta give that plan a try. The thing she stressed, that I really liked was how she said it kept her family together while her husband flew planes in the military and later for an airline. He was gone a lot. She was like a single parent. And dinner around the table every night added structure to her day and a bonding with her kids. They still all come back for Pizza night. She has many gourmet types of pizza as you can imagine. Her favorite is arugula, fresh mozzerella, cherry tomatoes and olive oil on thin crust. I'll do that on a later post.
    Yeast mixed with warm water and sugar.....let it foam up a bit.....
    Then add the flour and salt and mix up with warm water....a little at a time until it is a nice ball....Then knead
    for a minute on the counter....
    Here are mine kinda kneaded and waiting to be put into the pan....took 5 minutes to make and roll!  
    I went over to Spoons and Spice to see if I could find a "Baguette Pan" 
     HERE is a page full of coupons to Spoons and Spice. It's a really fun place to browse around if you are a foodie like me.
    Anyway it looks cool....it's 2 long u shaped pans for breads....
    The food nanny makes this bread and gives it away for people's birthdays and special occasions. What a great gift idea and so quick. Who wouldn't love some hot french bread homemade by you?

    Here's the Baguette pan.  It was only $5.99 at Spoons and Spice! Or check these out!
    Recipe for French Baguettes... SO EASY!
    1/2 Cup Warm Water
    1 1/2 Tablespoons Yeast
    1 teaspoon sugar
    1 teaspoon salt
    3 1/4 cups flour add a cup at a time
    Add up to one cup warm water to get perfect consistency

    Mix up first 3 ingredients in a small bowl and let sit for 2 or 3 minutes. (sugar feeds yeast so let it set awhile) Then in a separate bowl add salt and flour and add it to wet mixture, and then add the (up to 1 cup) warm water. Mix and then knead for a minute. Roll out in 2 loaves and lay them on greased baguette pan and let rest for 15 minutes under a towel (it will rise a bit).  Then bake 450 for 15 minutes or until golden colored.   This whole french bread takes about 35 minutes total to make and bake.
    So here they are before the 15 minutes rising time.....Both have their own tube to sit in....
    And here they are after the 15 minutes rising time....I put a line down the middle of each with
    a sharp knife just before popping in the oven....it will look just like french bread when it has been baked! 
    Wha la!  Ready for a hot 450 degree oven for about 15 minutes....watch it the last  minute or so.....

    And here they are, hot out of the oven! French Baguettes are light and crispy! 

    Well, they are just plain DEEE-LISH!  That's what they are!  I sent one down to my friend Lauri down the street. Spread the lovin!   
    Then Spread some REAL butter and dig in!  mmmm....Yummy! 


    Tuesday, July 2, 2013

    Pulled Pork in a Dutch Oven

    Dutch Oven Pulled Pork....so yummy!
    I think dutch oven cooking is fun okay? It is a LOT of work when you are camping, but it is simply fun to watch the pots covered with coals do their thing. And kids love dutch oven stuff. It's a great family "making memories" time. I would do it in the backyard on a cookie sheet if I don't like to camp.
    But if you don't like outdoor cooking, try some pulled pork from the crock pot. Either one is really so delicious.

    Tools for Dutch Oven Cooking.....
    Pork Ribs we bought from Costco....So we didn't have to pull apart the meat....they are cut already so they just fall apart in the cooking process....

    Just dry rub and season with salt, pepper, garlic and onion powders and some brown sugar....
    Here are 3 recipes for dry rub. Take your pick. Each makes about a cup of dry rub. 
    • 2 tablespoons salt
    • 2 tablespoons sugar
    • 2 tablespoons brown sugar
    • 2 tablespoons ground cumin
    • 2 tablespoons chili powder
    • 2 tablespoons freshly ground black pepper
    • 1 tablespoon cayenne pepper
    • 1/4 cup paprika
    Dutch ovens come in all sizes. I have 2 of the  12 inch sizes which are most popular. 
    OR
    • 1/3 cup paprika
    • 1/4 cup sugar
    • 3 tablespoons black pepper
    • 2 tablespoons salt
    • 2 teaspoons dry mustard
    • 2 teaspoons cayenne
    • 1 teaspoon white pepper
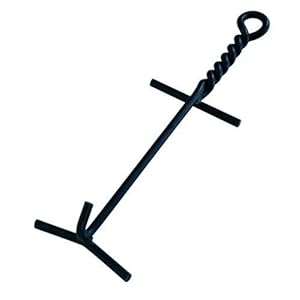
    Lid Lifter for the dutch ovens...you will really NEED one of these.....
    OR
    You can see the fire ring has the coals in a big pot to use for the ovens.....
    • 1/4 cup paprika
    • 2 tablespoons salt
    • 2 tablespoons onion powder
    • 2 tablespoons fresh ground black pepper
    • 1 tablespoon cayenne

    Here is My recipe. It tastes sweet more than spicy ...it makes about 1/2 cup of rub which is enough for my family. You can double it. 

    1/4 cup brown sugar
    1 1/2 Tablespoon Seasoning Salt (Lawry's or Johnny's)
    1 teaspoon Chili Powder
    1 teaspoon  Black Pepper
    1 teaspoon Onion Powder
    11/2 teaspoons paprika

    Rub it all over dry ribs and let them sit 1/2 hour before cooking. Add a little bit more brown sugar ( 1/3 cup) and the rest of the dry rub an hour before you want to serve them by pouring it on top of the cooked pulled pork. I love Cattlemen's BBQ sauce over my ribs and Famous Daves Sweet and Sassy Sauce too. I would choose one of those to have on hand when the pulled pork is done.
    Lodge Dutch Ovens are a very good brand. Check out my KITCHEN STORE at the top of my blog if you want some  Dutch Oven tools and cooking products. They are ones that I have in my kitchen and home. 


    Dutch oven OR crock pot....pulled pork can be done either way. 
    Pour a 1/4 cup of oil into your pot to start and then add the pork in 1 layer. Add dry rub if you haven't already. Then put the top on and add your coals to the top and bottom. I think most cooks will do dutch oven meats for around 3 hours.  It is like cooking them in a slow cooker crock pot. You can also DO this in a crock pot for more like 5 hours.  Either way they fall off the bone. 

    We had dessert in one, potatoes with bacon and cheese in another and  pulled pork in another. The top one was just for looks. So cute, right? Dutch oven dinners are fun to do. The holder to the left is another way to put coals down for the first dutch oven. But they are really expensive.  Another way is to use a dutch oven stand. 
    These are expensive and not as necessary unless you plan on doing it a lot. But they do keep the wind out of your dutch oven and the ashes out of your food! 
    Use a charcoal tower to light up the coals. When they are just gray on each of the 4 edges they are ready to go. Layer about 12 underneath and 10 on top depending on your size of pot. I like the 12 inch pots. Lodge is a great brand if you want to buy one.

    You can also do dutch oven in the oven with one of these  9.5 quart Dutch Ovens. But they are VERY expensive.

    SEASONING YOUR NEW DUTCH OVEN 
    Be sure to "season" it before using a new one. It will come with wax in the bottom of the pan. Scrape it out and wipe with a paper towel. Rub just a tiny bit of Wesson oil on the inside and outside surfaces with a rag or paper towel. Then put the lid on one rack and the pan on the other. Let it bake for an hour and a half on 450.  It will smoke your kitchen up so be prepared and open windows or your smoke alarm will go off!!  When the smoking is all gone, it is seasoned and should look more black than grey. It will continue to get seasoned as you cook with it.  Don't ever wash dutch ovens with soaps! Just rub it out with warm water and reoil it a tiny bit before you put it away or it may rust. Always let it air dry or oven dry before storing.

    A close up of our finished pulled pork from a Dutch Oven.  Boy I wish I had some right NOW!! 
    When they are done, pull the pork out of the pan and leave some of the sauce in the pan so you don't douse your rolls with too much liquid. Add the bottle of your favorite BBQ sauce to the pork. Then serve in a foil pan or large casserole dish and keep covered. Here are our finished pans of pulled pork from a Dutch Oven. 
    Don't you want a bit of delicious Dutch Oven Pulled Pork? Buy some soft sub rolls or sandwich type rolls and add pulled pork and maybe some extra bottles of BBQ sauce on the side. So decadently Yummy either from a crock pot or dutch oven, they are both wonderful! 


    Saturday, June 29, 2013

    Banana Macadamia nut muffins

    We got some fun gifts from Hawaii this week! 

    My daughter came back from Hawaii and brought my hubs and I some yummy Macadamia nuts! I love them in cookies and stuff. So I wanted to use them in some kind of muffin or bread. Doesn't this look good? Well it IS!

    Banana Macadamia Nut Bread....it's delicious!
     I looked around the kitchen and I had some bananas, some were overripe too! So this is what I came up with. I mixed up a couple of recipes I liked because I wanted this to be rich and dense, fruity bread.

    Most of my bananas looked worse than these, but those dark, spotty ones make the best banana bread! Don't throw them out! 

     I hate it when my banana bread is dry. With the added applesauce and all that banana and egg it makes it really rich and yummy. I did NOT take a picture of my yucky brown bananas. But it is a GREAT way to use them up.

    So I made this yummy Banana Macadamia Nut Bread with the Mouna Loa Macadamia Nuts!

    Ingredients are all in my pantry, that's the kind of recipe I love.....an EASY ONE!! 
    Here I added walnuts AND Macadamia Nuts from Hawaii to the mix....we love nutty breads! 
    RECIPE FOR BANANA-MACADAMIA NUT BREAD
    2 cups all-purpose flour
    1/4 teaspoon salt
    1  teaspoon baking soda
    1/4 teaspoon baking powder
    3/4  cups white sugar
    1/4 cup brown sugar 
    3/4 cup butter or margarine
    1 1/4 cups mashed overripe bananas
    2 eggs, beaten
    1/2  teaspoon cinnamon
    1/4 teaspoon nutmeg
    1/2 cup chopped macadamia nuts
    1/2 cup chopped walnuts

    Mix up dry ingredients and set aside. Then in a mixing bowl, add wet ingredients scraping sides. Then add dry mixture. Finally add nuts. (You can add 3/4 cup chocolate chips to the mix for a fun variation). Bake at 350 for 30 to 35 minutes. It is done when top is browned and a few cracks show in the middle. 

    It was DEEElish. My son Devin is home for a visit from Chicago and he and Caitlin liked it a lot. Well, we liked holding little baby Lena a LOT!

    Here is Little Miss Lena! She smiles non-stop 24/7 

    We took her to Texas Roadhouse for dinner tonight and she sat smiling for over an hour in the high chair.
    What more could you ask of a 6 month old? Not a thing! 

    These 2 girls love their Uncle Devin a LOT! He plays chase through the house with them.  

    Of course they had to do a silly picture too!

    Yummy Banana Macadamia Nut Bread

    LinkWithin

    Related Posts Plugin for WordPress, Blogger...