Tuesday, March 24, 2015

Farfalle with Lemon Garlic Alfredo Sauce

I love to eat pasta. I'm a pasta nut. I love the many different kinds of sauces I can make to go on it. And best of all; everybody in my family likes it too. It is sometimes hard to get little kids to like a new recipe. But if you feed them bowtie pasta, with this cheesy sauce, they will love it, I promise! I had my grandkids living with me for 2 months while their new house was being built, and they all loved it! And they were ages 7, 6 and 2. Pasta with Lemon Garlic Alfredo Sauce  Farfalle Pasta with Lemon Garlic Alfredo Sauce

This dish has a light alfredo sauce with a hint of lemon. I usually put either spinach or broccoli florets in it with tomato and top it with Parmesan cheese. It is pretty easy and takes about 15 minutes total.I add carrots, chicken and spinach to my Farfalle Pasta with Lemon G
I add carrots, chicken, tomatoes and spinach to my Farfalle Pasta with Lemon Garlic Alfredo Sauce.

DIRECTIONS FOR PASTA WITH LEMON-GARLIC ALFREDO SAUCE

Boil your favorite kind of pasta in salted water. I usually throw the 2 chicken breasts in first and boil them if I don't have any grilled or rotisserie chicken. Boil the chicken for 6 minutes or so and cut them in fourths halfway through boiling, to be sure they cook through.  Then add the pasta. I added a cup of baby carrots to mine at the same time. But I steam my broccoli in another pot.  Cook until tender.
A good Alfredo Cream sauce has butter, cream and Parmesan Cheese basically.

While that is cooking, mix 1/4 to 1/2 cube of butter with 1/4 cup to 1/3 cup creme. Add a few shakes of Garlic Salt (My favorite is Johnny's from Costco). Then add 1/4 cup of sour creme. If you like lots of sauce double this. It is kind of evenly 3 parts butter and cream and I usually put in a dollop of sour cream just to make it creamier. Then shake on 1/4 cup of the Parmesan cheese and about then the pasta should be done.Add some French Bread and a side salad if you have a crowd. Add some French Bread and a side salad if you have a crowd.

 Cut the chicken pieces into bite sized pieces, and then just spoon out the pasta with a large slotted spoon into the bowl with all the cream and cheese. The carrots go in too and then the spinach chopped up. I use just a handfull of spinach, like 1/2 cup. Toss lightly. Add the juice from about 1/3 a lemon. It is about 1 1/4 tablespoons.

Add seasoning salt (Again, I like Johnnys). Add pepper and parsley flakes.  Add the steamed broccoli or fresh, chopped spinach last while tossing. It is also good with some additional Parmesan cheese sprinkled over each serving.

INGREDIENTS FOR FARFALLE WITH LEMON GARLIC ALFREDO SAUCE

  • A package of your favorite pasta (farfalle, fettucine, etc.) boiled and drained
  • 1/3 cup butter 
  • 1/2 cup cream 
  • 1/4 cup sour cream (a dollop or two) 
  • 1 1/4 Tablespoons fresh lemon juice 
  • 1/4 cup Parmesan Cheese (plus extra per serving if desired) 
  • 1 cup baby carrots 
  • 1/2 cup fresh spinach  OR 3/4 cup steamed broccoli florets 
  • 2 chicken breasts diced up into bite sized pieces 
  • 1/3 cup of grape tomatoes (put in just before serving) 
  • 1/2 to 3/4  teaspoon Johnny's garlic seasoning (shake some on and then taste) 
  • A few shakes of parsley flakes for color Pepper to taste 
 It is a full meal and if you want less calories just skimp on the sauce or water it down with milk instead of sour cream. It is yummy and filling. I serve it with french bread and fruit. It is one of our family's favorites. Pasta with Lemon Garlic Alfredo Sauce is a great weeknight meal.
Pasta with Lemon Garlic Alfredo Sauce is a great weeknight meal.

Saturday, March 21, 2015

Soft Homemade Pretzels

I love those to get one of those soft pretzels from the Pretzel Shack in the mall. Their soft pretzel bites and pretzel dogs (mini pigs in a blanket) are soooooo yummy I had to try to make some at home!
Here's my yummy soft pretzels! 
They took some time but were easy to make, and VERY light and soft. 
 I found a Homemade Pretzels recipe that would be great for a March Madness treat for the men who are glued to the bigscreen T.V. It is from Smitten Kitchen HERE.  She adapted her recipe from Martha Stewart's. 

Then I looked at 3 more recipes and read comments for about an hour. Then I looked up recipes on the Food Network and All Recipes.com.  I chose this recipe because of all the positive comments. It is from the FOOD NETWORK. It is Alton Brown's recipe and there was also a video. The link is HERE.
Then I watched a few you tubes on pretzel making and Martha Stewart had a video too. Those are THE BEST ways to learn how to cook something! You tube videos!! I adapted this one after making it.  My recipe has a little more sugar and less salt. And I did not bake mine as long. I like them lighter and soft, not hard on the outside so I added DOUGH ENHANCER POWDER.
My dough mixed up and ready to cover.....
DIRECTIONS FOR SOFT PRETZELS
Start by Mixing the warm water and sugar and then sprinkle on the yeast packet. Let it sit until it is foamy. They call that "proofing" the yeast, it will take 5 minutes. Then add the salt and melted butter and put your dough hook on your mixmaster. Add a cup of flour to start. 
Add the rest of the flour and some dough enhancer.  Knead for a few minutes.  
The Dough Enhancer makes bread softer and doughier. You can get it from Bosch bread making supply store.  They were easy and yummy and kinda fun! 
Soft Pretzels (my recipe adapted from Alton Brown)
1 package instant dry yeast
1 1/2 cups warm water
1 1/2 teaspoons granulated sugar
1 1/2 teaspoons salt
4 Tablespoons melted BUTTER
1 teaspoon dough enhancer (optional for softer pretzels)
4 1/4 cups all purpose flour
Mix, knead, let rise for an hour, then roll out and make your pretzels. Place on parchment paper on cookie sheets and bake for 6 to 7 minutes at 425 degrees.
Now we are ready to roll the pretzel dough out.....it has puffed up quite a bit....
 Always use less flour to start on any bread recipe. Then slowly add in by cupfuls.  This dough was smooth, not really very sticky at all. 

Then place dough ball in an oiled pan and cover for an hour to let it rise. Then I rolled it out on my surface.  Make a big rectangle shape. My dough was about 1/2 inch thick, maybe a little less. 
I rolled pretzel dough  into a rectangle.....
Get your pizza cutter and cut the dough down the middle, then 2 more times to make 4 sections. Then cut each section into 3 or 5 strips, depending upon how large or small you want your pretzels. 
Cut Soft Pretzel Dough into 4 sections with a pizza cutter, and then cut each section into 5  skinny strips....to make 20 pretzels.
If it is for a party I recommend the 5 strips. This will give you 20 good, 3 inch bite sized pretzels. If you do the larger (palm sized thick pretzels) 3 strips will make 12 big and soft 5 inch pretzels. 
                            Here were my ingredients....and my cute new RACHEL RAY PAN! It is oval, and orange, with a soft, rubber handle and with a pour spout. SO CUTE right? I love her stuff! I got it on sale at J. C. Pennys! Only $15 bucks and I had a 20% off coupon if I opened a charge (yes I'm a sucker for a coupon!). 


(Mix a bath of 5 cups hot water to 1/3 cup baking soda in a deep fry pan. Set on warm on stove for after pretzels are made and formed.) 
I mixed up the baking soda and water hot bath....left it on low on the stove and then formed my pretzels....
They take less than a minute each in the hot water bath...just like a bagel!
I played with my dough making all kinds of shapes....it would be so fun for kids to do too! 
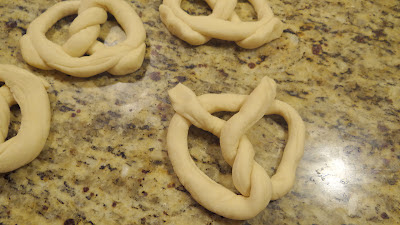
Roll it, flip it twice around, then turn each end up and pinch...
To roll them I made a long snake, 12 to 16 inches long, and then make make a loop, then twist it once again and take the tails and flip them up to the round loop and press them down. Then I turned each one over. 
Soft Pretzels.   That's it!  
Then drop them in the baking soda and hot water bath....just for like 45 seconds each...

Pick pretzels up with a slotted spoon and place on a cookie sheet with parchment paper on it..
More playing with soft pretzel dough....lol.....
Oh boy is this fun! I got about 3 cookie sheets full...About 20 pretzels....


Top each pretzel with a sprinkle of kosher salt before baking. (not much, or too salty!)
Sprinkled on the salt....
Then ready to bake! 
Bake in 425 oven for 5 1/2  to 71/2  minutes. Watch them as each oven is a little different. My top shelf cooked them faster than my bottom shelf too, so I had an extra minute on the lower shelf of pretzels.
Here they are just hot out of the oven....soft and yummy....If you like them hard on the outside just do an egg wash and cook them a bit longer in the oven...they will have a stiffer, smooth and chewy outside.....
Add the melted butter on with a silicone brush....
When they come out of the oven brush them with melted butter and a silicone brush. EAT! They are lightly crisp on the outside and buttery chewy inside. Yummy! The hubs loved them! He loves anything salty. 
Oh yeah....that's what I'm talkin about!  I brought them to my classroom the next day
for our little cast party....we are doing 4 little fairy tale plays....I brought O.J. to go with them...yum! 
Dip them in chili, mustard,light cream cheese with raspberry homemade jam, or cinnamon and sugar or just plain. Next time I'll try putting a 1/4 slice of hot dog inside each one and make pretzel dogs! That would go great with mustard.... mmmm.........


Friday, March 20, 2015

Little Smokies Hash Browns

Hash Browns with Peppers and Avocados
Little Smokies Hash Browns for breakfast today. Yummy-licious!

 I love hash browns. I love going out to breakfast and getting pancakes and hash browns. They are my favorites! But today I just stayed home and made my own breakfast skillet creation; Hash Browns with Peppers and Little Smokies.
Hash Browns with Peppers and Little Smokies Little Smokies Hash Browns
Ore Ida Potatoes O'Brien is the start of a yummy skillet breakfast.

 I start with the Potatoes O'Brien. They are cubed hash browns with onions and peppers. Then I added a handful of Little Smokies sliced up. I put them in a hot skillet with some olive oil and fried them up for 5 minutes. Lastly I added a few slices of fresh avocado

DSC08500

I added some fresh, sliced pears, strawberries and mini oranges called CUTIES and toast. It was a yummy breakfast. I love fresh fruit now that we have so many in season.

DSC08506

It was a yummy breakfast. The hubs even thought so too!

Monday, March 16, 2015

Pantry Organization Part 1

Pantry Organization After Picture - Syrups and Sauces on Lazy Susans. 
I'm on a roll organizing my house this year.  I've been working on purging the kitchen of all the extra clutter, and buying Lazy Susan's to keep all my stuff organized that I am keeping. I'm starting now on the pantry organization.
Pantry Organization After Picture. Now all my vinegars and sauces have a home in the pantry. It is much easier to see what is there. Also, there is a limit to how many can go on each Lazy Susan. 
Pantry Organization Before Picture.....not so pretty. I have so many canned goods that I have to sort and make a place for. So this is my March challenge. Organize the pantry and make it look neat and tidy. 
I found containers for the puddings and the jellos. It makes them easier to sort and to see what I have too. I like how it turned out. Baskets are cheap to buy at a thrift store and you can get all sorts of sizes for a buck. 


Baskets are cheap at the thrift store. They come in all sorts of colors and sizes. I have been buying them for 50 cents to a buck. It is the perfect thing to sort things in the pantry. 

Then I lined up all my cake and brownie boxed mixes onto a shelf that we will call the baking shelf. It will house all my flour, sugars and baking tools. They are all organized now on their own shelf. Such an improvement!  
In January and February I worked on all my kitchen drawers and cupboards. They went from this messiness.......

To this Kitchen Organization....check it out HERE at Weekday Chef.
Finished! Pantry Organization looks great! At least this first shelf! Now on to the canned goods!
Check out my January post on kitchen drawer organization HERE. 


Wednesday, March 11, 2015

Pork Chops in Mushroom Gravy


I LOVE these finger lickin good pork chops. I use the thicker pork chops from Costco and coat them and fry them in a little olive oil before backing them in this tasty gravy. They come out super tender and delicious. My family loves them! 
Breaded Pork Chops in Mushroom Gravy....chicken fried!
PORK CHOPS IN MUSHROOM GRAVY
4-6 pork chops
A few shakes of  Lawry's Season Salt
A few shakes of pepper.
1 cup flour
1 egg
1 cup Italian Seasoned Bread Crumbs (optional for more of a coating)
Roll chops  in egg then in flour. Then repeat for a thicker coating or dip in bread crumbs if you want a crispy, thick coating. I just lightly floured mine after dipping in a whisked up egg. 

Pork Chops in Mushroom Gravy.....better than a pork chop on a stick! 

My hubs and I once went to a family reunion in Iowa to see all my relatives who are farmers back there. While we were there the Iowa State Fair was happening so we went to see one of the greatest State Fairs in the whole U.S.A. My hubs best memory? Eating a pork chop on a stick! He LOVES his pork chops. I love this recipe for cooking them. It is a great one to do with mashed potatoes because the gravy is so delicious you will lick it off your fingers, I promise!
I just did a light flour dusting this time on my Pork Chops in Mushroom Gravy.If you like them with a thicker breading, just leave them setting in the flour for 10 minutes then season them and fry. The more flour, the thicker the breading is. 
 Bread the pork chops with egg mixture, dip very lightly in flour, and season with Lawry's seasoning salt and pepper.Then fry them up in some canola oil.

You could also bread them heavily in egg, then flour, then egg then flour again if you like that crispy chicken fried style of pork chop breading. I've done it both ways.
Then blot the excess canola oil from your pork chops dry on a paper towel.
Put them in a 9 x 13 pan sprayed with Pam. Then put them in the oven on 300 for 45 minutes covered with foil.  


While they are baking in a foil covered pyrex 9 x 13 pan mix up the mushroom gravy with 1 can of Cream of Mushroom Soup, 1 cup of sour cream, 1/4 cup cooking white wine, and 3/4 cup milk, 1/2 cup sauteed mushrooms, and then season with pepper and a few shakes of Lawry's Seasoning Salt. I have used thick and thin pork chops with this recipe. If they are really thick I would bake them for a couple of hours on 300 degrees covered in foil. If they are thin, bake 45 minutes covered.
                      Bake your finished pork chops in a foil covered dish for 45 minutes to 1 hour if they are thin, 90 minutes if thick.
Mushroom Gravy
1 can cream of mushroom soup
1 cup sour cream
1/4 cup White wine or sherry 
1/2 to 3/4 cup milk
pepper and seasoning salt to taste
1/2 cup mushrooms sauteed in butter and garlic for 5 minutes

You don't need much salt as the soup is very salty already. Then pour it over your chops after they've baked for 45 minutes.  Let them bake another 15 minutes covered.  When they are done they should be pretty tender and very moist. The gravy is the best part so you can double the recipe if you are having mashed potatoes to go with your pork chops. Yummy. Enjoy!

Pork Chops in Mushroom Gravy - I think we did these over rice, but Mashed Potatoes are great too!


LinkWithin

Related Posts Plugin for WordPress, Blogger...